In the previous lesson, we made all necessary preparations to start exploring Vulkan.
Here is the diagram of the current state of the application:


The diagram is pretty empty for now but it will grow as we progress through the tutorials. For now, it’s enough to know that there’s a CPU, which controls the application and sends commands to the GPU; a GPU itself, which does the magic and produces nice pictures (not necessarily); a window that should present these pictures. The window is put in a separate category because the presentation of the picture is controlled by an OS and not by an application or a GPU.
The main question for now - where to start? There are so many things to do, there are so many ways to do it. I’d suggest starting from the heart of every graphics application - shaders. After all, this is exactly what GPU executes, and we’re here to program the GPU. In the app, we will use 4 shader stages - Vertex, Tesselation Control, Tesselation Evaluation, Fragment. Let’s step over all of our shaders, briefly explaining the purpose of each.
Vertex shader
Vertex shader is the first programmable stage in the pipeline, and it’s pretty simple. Looking at the teapot data, we know what information needs to be passed - since we’re using patches, we need points to describe them - 16 points per patch.
A patch point arrives in the shader via ControlPointBuffer in a binding slot 0 (resources are bound to special positions or slots - more on this in next tutorials) and is simply passed through to the next stage. This stage will be executed for every point (vertex). Since there are 28 patches, 16 points each, it will be called at most 28 * 16 = 448 times or less because of caching (it’s not important information, just for fun). I decided to use a storage buffer instead of vertex attributes - it simplifies the code a bit.
Tessellation control shader
The next shader - tessellation control shader - is simple as well and it doesn’t do a lot of work. But still, it has a couple of interesting moments. The first one is how the tessellation level (how many new triangles a tessellator should create) is updated. I decided to use a so-called Push Constant - a feature that allows passing a constant directly in a command buffer. For now, it’s enough to know that it’s a fast and simple way to update data and later we’ll see what this means exactly when we’ll reach this in the code. You can see in PushConst definition that the tessellation level is a float variable.
Next, we tell the GPU that this stage produces 16 control points for the patch, i.e. we don’t change the amount (yes, this stage can generate new points as well as remove some). And the number of executions of this shader is equal to the number of specified points per patch times the number of patches, i.e. 28 * 16 = 448 in our case.
Tessellation Evaluation shader
Tessellation evaluation shader is the actual workhorse of the whole application - all the magic happens here.
First, we specify tesselation rules: domain (quads), spacing (fractional_odd_spacing), and winding order (cw - clockwise). Next, we define the patch data and if you forgot what it’s for, see previous lesson. The data comes as an array of PatchData in a binding slot 1. Also, we need transformation matrices which are provided as a single MVP-matrix via Uniform Buffer bound to slot 2.
Next is scary math - calculation of a 3d point using a gl_TessCoord that came from the tessellator. Actually, the math is not that complicated, this Gamasutra article explains the theory behind curves very well. And the code itself (functions bernsteinBasis() and evaluateBezier()) I shamelessly took from this GDC presentation.
The outputs of this shader are the newly generated vertex position (written to built-in gl_Position variable) and color (which we send to the next stage in the output location 0). Since the entire patch should be colored with a solid color, every vertex from the same patch should have the same attribute. gl_PrimitiveID is the index of the current patch in the series of patches being processed for this draw call and for every generated triangle in the same patch it will be the same.
The number of executions of this shader is equal to the number of vertices produced by the tessellator. And it depends on the tesselation factor, which we specified in the tesselation control shader.
Fragment shader
Fragment shader is another “lazy” shader - the data is coming from the previous stage at input location 0 and going to the output location 0 (which is a swapchain image, the window surface).
Hurray! We’re done, let’s go home! Joking. Once I read the sentence that describes Vulkan in a nutshell: “Show me your first triangle in three months." So be patient. There’re 7 parts are planned in total. Shaders were the easiest part, and all the remaining code we need to write serves a single purpose - to make the shaders run. And run correctly. By correctness, I mean that there should not be data races, GPU stalls or undefined behavior.
Finally some Vulkan
Before we start, we need to decide how we’ll access a Vulkan library, which should be installed in our system. After all, it’s written in C and provided as .so library. In Rust it’s pretty easy to call C-functions with FFI. I even wanted to write a wrapper by myself. It’s not hard and is a good exercise that helped me to know Rust better. But there’re two reasons why I didn’t do that:
- It’s unusable outside of these tutorials.
- One of the dependencies (
gpu_allocator) requires anotherVulkanwrapper (ash) as its dependency.
In the end, my choice fell on the ash crate. At the moment of writing, it is the most up to date with the Vulkan wrapper, it’s clear and very lightweight. Because it develops very actively and introduces breaking changes quite often, I have to freeze the crate version on 0.33.3.
I’ll try to highlight the differences between C and Rust on a function that creates a shader:
VkResult vkCreateShaderModule(
    VkDevice                                    device,
    const VkShaderModuleCreateInfo*             pCreateInfo,
    const VkAllocationCallbacks*                pAllocator,
    VkShaderModule*                             pShaderModule);
impl Device {
    unsafe fn create_shader_module(
        &self,
        create_info: &vk::ShaderModuleCreateInfo,
        allocation_callbacks: Option<&vk::AllocationCallbacks>,)-> VkResult<vk::ShaderModule>
}
Cis a standalone function,Rustis a method. That means that theRustfunction should be called on an instance of theDeviceobject via a.operator and in theCversion thedeviceis passed explicitly.- In
Cthe function return the result viaVkResultenumeration and in case of success (VkSuccess) it writes the data in a mutable pointer (VkShaderModule*) whereas inRustthe result is returned through a very convenientash::VkResultwhich is an alias toResult<T, ash::Result>whereash::Resultis an enumeration of all possible outcomes, the same asCversionVkResult. In other words, in case of success, the desired object will be returned, in case of failure - the error code. Rustversion isunsafeand a lot of attention should be paid to passing temporary objects - in theunsaferealm the compiler will not check lifetimes! Here it’s very similar toC/C++.
Besides that, everything is pretty identical, and if you already know C/C++ everything should be butter smooth for you.
So we have some shaders written as text. But we can’t use these text files directly. In Vulkan, shaders have to be compiled into a so-called SPIR-V binary format and supplied to the API via ash::ShaderModule. We can create one with the aforementioned ash::Device::create_shader_module function. Let’s look at the declaration one more time:
impl Device {
    unsafe fn create_shader_module(
        &self,
        create_info: &vk::ShaderModuleCreateInfo,
        allocation_callbacks: Option<&vk::AllocationCallbacks>,)-> VkResult<vk::ShaderModule>
}
The return value is what we’re interested in. The third parameter (allocation_callbacks) is used for custom allocation and will never be used in these lessons (always None). The second parameter (create_info) is the information that describes a shader and we can fill it right now. But the first parameter (self) is what we don’t know. This is a so-called Device - a software representation of a GPU. Think about it as an instance of a real physical GPU - while there’s always only a single piece of physical hardware there can be multiple instances of logical devices in one application (though we will use only one). We can create a device with ash::Instance::create_device function:
impl Instance {
    fn create_device(
        &self,
        physical_device: vk::PhysicalDevice,
        create_info: &vk::DeviceCreateInfo,
        allocation_callbacks: Option<&vk::AllocationCallbacks>,
    ) -> VkResult<Device>
}
where self is an unknown instance of ash::Instance, allocation_callbacks - None, create_info - some information, physical_device - again unknown. It represents a unique piece of hardware and can be used for obtaining some useful info, like capabilities and limits of the GPU. We can’t create an instance of a physical device, but can ask the API to give it to us with ash::Instance::enumerate_physical_devices - this function enumerates available physical devices in a system:
impl Instance {
    fn enumerate_physical_devices(&self) -> VkResult<Vec<vk::PhysicalDevice>>
}
where self is, again, an instance of ash::Instance. Oh my, this will never end…
In addition to the unknown instance thing, the function returns a list of all available devices in the system, but we’re interested only in one. For our application, we need a GPU that supports tesselation, wireframe mode and can output images to the operating system’s presentation engine. Yes, it sounds weird but in theory, there can be a device that can’t render, but it will work fine with Vulkan. Running a little bit ahead I’ll tell you that in order to check the device’s “presentability” we need some information about a rendering surface. In Vulkan this information is stored in ash::vk::SurfaceKHR object. Fortunately with ash-window crate getting this object is an easy task:
pub unsafe fn create_surface<L>(
    entry: &EntryCustom<L>,
    instance: &Instance,
    window_handle: &dyn HasRawWindowHandle,
    allocation_callbacks: Option<&AllocationCallbacks>
) -> VkResult<SurfaceKHR>
Here ash::EntryCustom is ash-specific and can be easily created without any dependency. It is a thing that knows where to find certain functions. And the already seen before ash::Instance is an entity that keeps the state of the application. We can create it with ash::EntryCustom::create_instance function:
impl<L> EntryCustom<L>
    pub unsafe fn create_instance(
        &self,
        create_info: &vk::InstanceCreateInfo,
        allocation_callbacks: Option<&vk::AllocationCallbacks>,
    ) -> Result<Self::Instance, InstanceError>;
}
There should be one instance per application.
Let’s return to the surface thing - ash::vk::SurfaceKHR. It’s somewhat special - the KHR ending means that this object is not a part of a standard Vulkan, but an object that can be obtained through extensions. Indeed, presentation is so OS-specific that it’s very hard to make it a part of a standard. There are instance-level extensions and device-level extensions. Extensions are provided as strings during the instance or device creation, and for the surface extension, we need the name which is platform-dependent. We’ll find out how to get the name later.
At this point, there are no more unknown variables! But I already forgot why do we need all this… Ah, indeed, I wanted to create Shader Modules.
To summarize, here’s the dependency chain:
VkShaderModule -> VkDevice -> VkPhysicalDevice -> VkSurfaceKHR -> VkInstance -> extensions
Or in words:
- To create a shader module, a logical device is needed.
- The logical device requires a physical device.
- To get a physical device, we need to know surface properties.
- For the surface, an instance is required.
- Additionally, for the surface an extension name is required which should be provided during the instance creation.
Next, we’ll step through the code to find out how to create everything we need.
Required window extensions
Both device and instance extensions need to be passed to the base initialization. For now, we’re interested only in instance extensions which we get in teapot::get_required_instance_extensions. This function is very specific to the application itself because different applications may need different extensions. That’s why it is in the teapot workspace. This function is called from the main.rs and the result is passed further. ash_window crate helps a lot - the ash_window::enumerate_required_extensions hides from us the platform-dependent code and returns the list of instance extensions, required for displaying an image on a given platform. On my Ubuntu platform it returns: "VK_KHR_surface" and "VK_KHR_xcb_surface".
Additionally, we add one more extension - "VK_EXT_debug_utils". This one is very useful for debugging. With it, we can give objects meaningful names. Some tools use these names when describing a frame. For example, RenderDoc. That is how it looks with and without names:

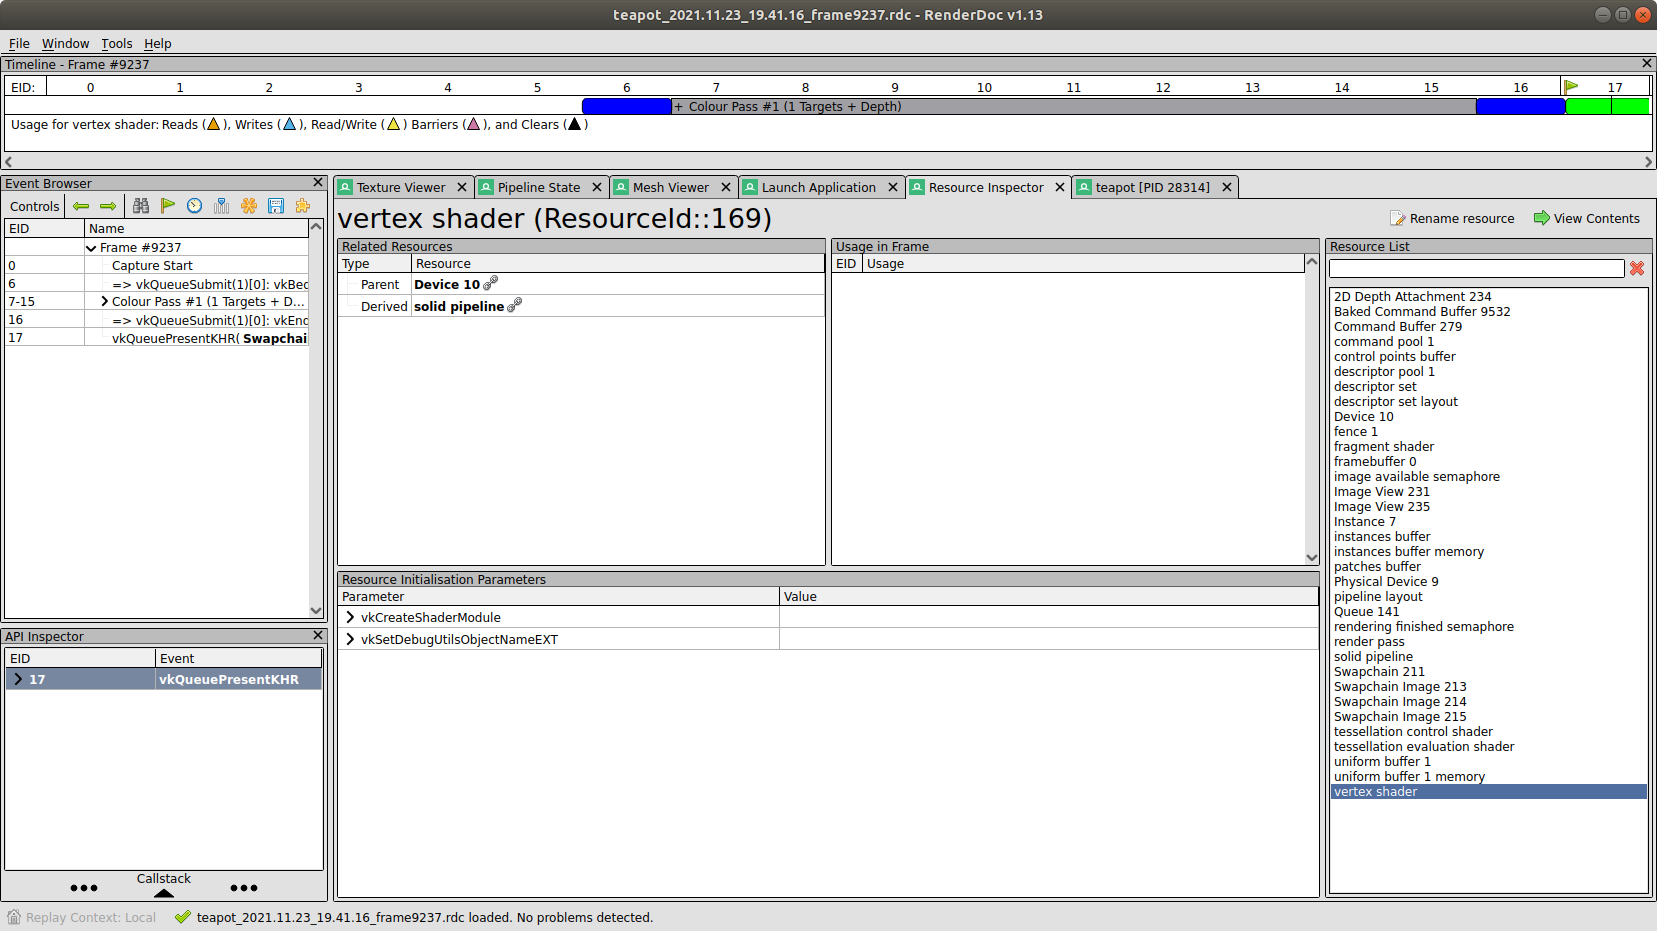

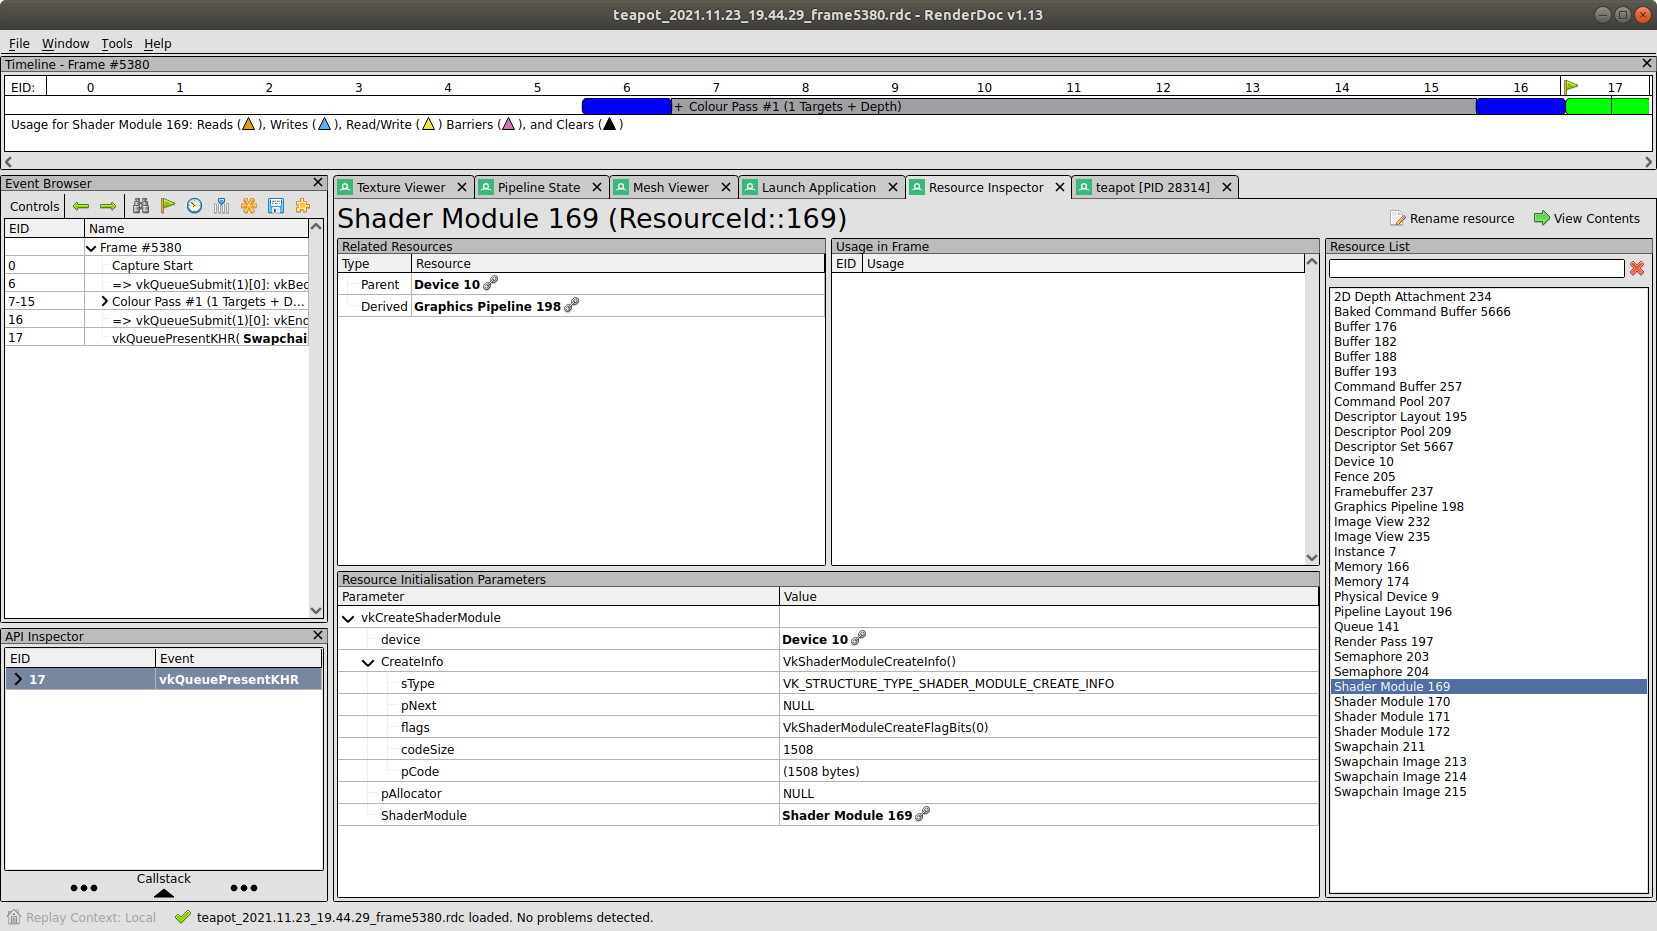
In the first case, the tool displays the names we gave to the objects (like vertex shader or uniform buffer). In the second case, it shows just some generic names.
Moreover, the Vulkan layers use names in their messages. More on layers a bit later.
Instance
With the lists of extensions, we can move to the vulkan_base workspace where the major part of today’s code will take place. We begin the initialization in vulkan_base::VulkanBase::new function. First, we create the entry in vulkan_base::create_entry function. It is a pure ash entity and doesn’t require any parameters to create.
You probably know that Vulkan evolves, and there’re multiple versions of the API. Each newer version adds new core features, new functions, new structs. While the older version is fully compatible with newer, the other way around obviously doesn’t work. Though I’ll not use any functionality from the API > 1.0, I want to show how to enable the newer version. We’ll use Vulkan 1.2 as a minimum required version (and the latest at the moment of writing). In vulkan_base::check_instance_version, we check that the instance supports that version. Inside the function we call ash::EntryCustom::try_enumerate_instance_version. This function is an example of the new functionality - it was introduced in 1.1. If it returns None that means that the current Vulkan in the system has version 1.0 and we can’t proceed. The solution is to update the driver. If it succeeds, it returns the API version, and we simply check that we’re not less than 1.2.
What can happen if the instance we’re trying to create does not support some of the extensions? Well, nothing good - the create function will return a failure result. That can happen if we use an older driver, for example, or a vendor-specific extension. And we want to handle this case by checking for supported extensions first. In vulkan_base::check_required_instance_extensions, we do exactly that - we request all supported instance extensions and then look if all of the required extensions are present in that list.
Finally, we can create an instance with vulkan_base::create_instance function. Here we can see the typical Vulkan approach to object creation - first, we fill a special structure that gets passed to a function. Normally, each structure has s_type field and p_next field. The former is used to specify the type of object we want to create and is different for different structures. The latter is used for some advanced things and will never be used in the tutorials. ash::vk::InstanceCreateInfo has these fields too. In Rust it’s common to use a so-called Builder Pattern that handles defaults nicely, and every structure in the ash crate has a corresponding builder. In the future, I will not describe these fields and others for which the default values are fine. Notice how we provide the api_version in another structure ash::vk::ApplicationInfo. Again, this structure has many fields besides the api_version, but all they are irrelevant for us and hence not described.
Next, I have to make a side note to explain what is this guard thing that surrounds the instance creation.
Scopeguard
I’ll start with a simple example. Suppose we have a C++ struct:
struct S {
    VkDevice device;
    VkShaderModule vertexShaderModule;
    VkShaderModule fragmentShaderModule;
}
And we want to initialize that struct:
auto init() -> S {
    S s{};
    s.device               = create_device();
    s.vertexShaderModule   = create_vertex_shader_module(s.device);
    s.fragmentShaderModule = create_vertex_shader_module(s.device);

    return s;
}
I hope it’s pretty straightforward and self-explanatory - first, we default-initialize the struct, and next, one by one, initialize the fields. But there’s a problem - if any of the calls fail, we don’t want to proceed further. Moreover, we want to clear what already was created. In the example above, consider that create_vertex_shader_module fails. In that case, our program should destroy the vertex shader module and the device. There’re many ways of how to fix this in C++. For example, something like this would work:
auto init() -> S {
    S s{};

    try {
        s.device               = create_device();
        s.vertexShaderModule   = create_vertex_shader_module(s.device);
        s.fragmentShaderModule = create_fragment_shader_module(s.device);
    }
    catch(std::runtime_error&)
    {
        throw std::move(s);
    }

    return s;
}

auto main() -> int {
    try {
        auto s = init();
    }
    catch (S bad) {
        clear(bad);
    }

    return 0;
}
Now go back to Rust. Let’s take the same struct:
pub struct S {
    pub device: ash::Device;
    pub vertex_shader_module: ash::vk::ShaderModule,
    pub fragment_shader_module: ash::vk::ShaderModule,
}
Here comes the first problem - we can’t default-initialize a struct in Rust. I.e., this will simply not work:
let s = S{};
Of course, we can create all the necessary objects for our struct and later feed them to the struct instance:
pub fn init() -> S {
    let device                 = create_device()
    let vertex_shader_module   = create_vertex_shader_module(s.device);
    let fragment_shader_module = create_fragment_shader_module(s.device);
    S{device, vertex_shader_module, fragment_shader_module}
}
But this will not work if we fail to create the fragment shader module - what should we return from the function? How should we clear the objects?
There’s an option to make the struct default-initializable:
#[derive(Default)]
pub struct S {
    pub device: ash::Device;
    pub vertex_shader_module: ash::vk::ShaderModule,
    pub fragment_shader_module: ash::vk::ShaderModule,
}

pub fn init() -> Result<S, S> {
    let s = S{};
    ...
}
In this case, the code works identically to the C++ version. But instead of exceptions, a result is returned with the partially filled Err(S). Then on the caller side, we can check which fields need to be cleared and take appropriate actions. That could work well in theory, but in practice, there’re third-party crates. Yes, likely, some of the structs in some crates can’t default. Then if we place it to our struct S, it becomes “default-uninitializable” too. ash::Entry is an example of such struct as well as ash::Instance and many others.
There’re many different solutions to the problem. For example, it’s possible to make the fields that don’t implement the Default trait optional by wrapping them in Option. Then by default, they will be set to None. But I find this unlogical - if my struct was fully initialized, then I’m sure that all fields are initialized too, and there’s no need to check if an option has value. And though unwrapping an Option is fast, it still has cost. There are other possibilities, but in the end, I decided to go with the scopeguard crate. What it does is wrap an object into a so-called ScopeGuard, and a provided closure is called on a scope exit. In other words, it’s RAII in action. For example:
let instance_sg = {
    let instance = create_instance(&entry, required_instance_extensions)?;
    guard(instance, |instance| {
        log::warn!("instance scopeguard");
        unsafe {
            instance.destroy_instance(None);
        }
    })
};
First, an instance is created, which is moved to the scopeguard::guard, which returns an instance of the ScopeGuard object. Together with the instance a closure is passed, which should be called upon the ScopeGuard instance destruction. If, for some reason, a function that created this guard will return earlier than was planned the closure will be called and will destroy the instance. When we reach the end of the function and are sure that everything went well, we can get our object back:
let instance = ScopeGuard::into_inner(instance_sg);
In this case, the guard closure will not be called. Though this approach adds some complexity, I find it very clear - we don’t need to wrap fields to an Option, we don’t need to create or duplicate additional structs. It just does what it was told to do.
Now let’s return to our VulkanBase initialization.
Debug utils
Previously I told about debug utils. After enabling the extension the new function is available - debug_utils_set_object_name. But to use it, we need to load it first. In C/C++ we need to get the address of the function, but in Rust we create a loader ash::extensions::ext::DebugUtils that knows where the functions for this extension lives. The loader is created in vulkan_base::create_debug_utils_loader function.
NOTE: It’s ok to create a loader without providing an extension. It’s not ok to call an extension function - the loader will simply crash. For example, if we remove
VK_EXT_debug_utilsfrom the extensions list during the instance creation but try to use theDebugUtils::debug_utils_set_object_namefunction,ashwill panic with the message:'Unable to load set_debug_utils_object_name_ext'.
Surface loader and Surface
Since a surface-thing is an extension, we need another loader - ash::extensions::khr::Surface which we create in vulkan_base::create_surface_loader. With it, we can call different surface extension functions (do you still remember how we got the necessary extension names before). The surface itself is a very platform-specific entity. Fortunately, the ash_window crate helps us again in vulkan_base::create_surface function.
Physical device
Now we can try to find a real GPU device in
vulkan_base::get_physical_device function. It’s a bit long because we need to check more than one thing. First, we need to get all available devices in the system. We do this with ash::Instance::enumerate_physical_devices(). Next, we iterate over the devices trying to find one that works for us. In check_device_suitability(), we accept only a device that supports API version 1.2, supports tesselation, can draw in wireframe, and supports all required device extensions. Device extensions are very similar to instance extensions we already discussed but work per device, not globally. We’re not using any in this tutorial, so the list is empty.
If the proper GPU was found we can continue to the next steps. We can try to obtain some information that depends on a device and/or a surface.
Device properties
This one is simple. The device properties hold useful information like device name, driver version, etc. We get them in vulkan_base::get_physical_device_properties function. Some functions in the API can’t fail and this is one of them.
Surface format
Next, we need a format of the surface we are going to render into. A given device and a surface can support multiple formats, and we choose one in vulkan_base::get_surface_format function. Here we get all supported formats first. Next, we iterate over all supported formats searching for the one we would like to work with. SurfaceFormatKHR{B8G8R8A8_UNORM, SRGB_NONLINEAR} is a good choice. And if the desired format was not found, we just return the first one from the list of available formats.
Present mode
After the format was found we proceed to a presentation mode. As you know, a monitor works with some frequency. For example, if the monitor has the frequency 60Hz, it presents on the screen every 1/60th of a second. The OS takes care of this presentation, and all we need to do is provide an image to show to the presentation engine. Also, you may know that a monitor presents the complete image not immediately at some moment in time but fills the screen line by line from top to bottom and do it very fast. Now think what can happen if the engine displayed half of the picture from the previous frame and we suddenly provided a new one? Right - the engine continues to present a picture but not the one it started with. On the screen, we have the combination of two images, the so-called tearing. Sometimes this is an admissible behavior and sometimes we want to avoid this. That’s why we need the presentation mode that we try to find in ‘vulkan_base::get_present_mode’ function. First, we get all available present modes for a given device and a surface. Next, we select the desired mode:
-
If we don’t want the tearing in our application, we tell the presentation engine to use its’ internal queue - now the pending requests will be added to that queue, and when the engine is ready to display it acquires the image from the beginning of the queue by removing it. And we never see the tearing.
MAILBOXtells the engine to use a single-entry queue, meaning that the pending requests will be replaced by the newest ones. This mode is what I want for the application, but there’s no guarantee that it is supported. -
If we failed to find
MAILBOXwe try to find the next one -IMMEDIATE. This mode does not use a queue, so tearing is possible. The mode is not guaranteed to be supported. -
FIFOis the only mode required to be supported, so we return it if the previous attempts fail. This mode uses a queue too, but the size is not specified. The difference withMAILBOXis that if the queue is full the application will be blocked until the engine removes the available image and frees the place in the queue.
Queue family
In the next step, we get the so-called queue family for the device. As you may know, the CPU communicates with the GPU via commands. In Vulkan, we record these commands with special functions like cmd_draw or cmd_bind_vertex_buffers to a so-called command buffer. After a set of commands is recorded, it needs to be sent to the device. We don’t send it directly but put it to some queue, and the implementation later consumes that queue. Just think of these queues as connection pipes between the CPU and the GPU. Vulkan defines 5 different queue families - GRAPHICS, COMPUTE, TRANSFER, SPARSE_BINDING, and PROTECTED. Each queue supports certain operations, so we need to be careful when submitting commands. The specification has a special section for every command where it specifies the queue a command can be used with. There’s a guarantee from Vulkan that graphics queue (GRAPHICS) supports transfer operations as well, so if you have to submit a transfer command you can do it with that queue, no need to create a transfer queue (TRANSFER). But why do we need multiple queue families at all? Well, in theory using multiple queues can speed up the application - the submission of commands happens in parallel. And you know the word parralel is the synonym of good. How this works is described by Matt Pettineo (aka MJP) in these amazing article series. There’s one more thing - each queue family can have multiple queues, hence the name family. So, again, in theory, you can use multiple queues from the same family to submit commands faster, you just need a proper GPU.
NOTE: though there’re 5 queue types, there’s a special command that requires a special queue property. This function is
queue_present()that takes a queue as a parameter, and that queue should support presentation to a given surface. Probably there’s a reason why the API-makers didn’t add another queue typePRESENT, but I don’t know it.
In vulkan_base::get_queue_family function, we first get all available families for a given device. Next, we try to find proper family queue indices. In the application, we will need 2 different queue types - one for rendering and the other for transfer. Since we know that the GRAPHICS queue also supports TRANSFER commands, we need only one queue family that can also be used for presentation. Though it’s not guaranteed that the GRAPHICS queue can present, the chances that your GPU has a queue that supports all of these operations are quite high. The correct solution would be to handle a case where this is not true, but this adds a huge chunk of complexity. So we search for a queue that can do both graphics and present (checked with ash::extensions::khr::Surface::get_physical_device_surface_support function), and if we can’t find any, we run to the nearest shop and buy another GPU. Note that this is the extension function and will fail if the proper extension was not included during the instance creation.
Depth format
Though we’ll not deal with depth buffering in the nearest future, we’ll still try to find a proper depth format today, so we don’t need to do it later. In vulkan_base::get_depth_format, we look for one of the formats we like. An image with the supported format should be capable of depth reading/writing, and also the tiling should be optimal. The specification says:
VK_IMAGE_TILING_OPTIMALspecifies optimal tiling (texels are laid out in an implementation-dependent arrangement, for more optimal memory access).
Logical device
Remember, the logical device is a software representation of a GPU and is needed almost for every other Vulkan function call. In vulkan_base::create_logical_device, we first tell a driver which queue families will be used with the selected GPU. Together with the families, we need to specify the number of actual queues and their priorities within a family. A queue with a higher priority theoretically can get more processing time than a queue with a lower priority. In the demo, we use only one queue family with one queue per family, so we simply set priority to 1.0. Notice that we only have a family index - a number, but when the logical device is created, the specified queue object is created as well. We’ll request that object in a moment. Next, we need to enable device features with the ash::vk::PhysicalDeviceFeatures struct. The application needs tessellation_shader and fill_mode_non_solid to be turned on. Recall how we checked if these features are supported when we searched for a suitable physical device. Also, we use the device extensions vector. For now, this list is empty since in the first tutorials we won’t use any device extensions.
All this data I provide via ash::vk::DeviceCreateInfo structure which is passed to ash::Instance::create_device.
Get device queues
Now when we have the device, we can get a queue object. Remember that we have only a family index and an index in the family which were specified during the device creation. In the function vulkan_base::get_queue we simply get our queue. This function can’t fail because as soon as the logical device is created, all the queues we specified were created as well.
This is where the base initialization stops (at least for now), and we can proceed to the application initialization.
Create shader modules
Let’s return to the teapot::VulkanData struct in the teapot workspace to create some shaders. But wait, remember we wrote the shaders in glsl? Vulkan doesn’t understand text files - it expects shader binary data in the SPIR-V format. Previously I wrote that a shader source should be compiled with a special tool, for example, with glslangValidator or shaderc. It is very tedious to run a command line to recompile the shader after every change, so it would be cool to add shader compilation as a part of the build process. Amazing Rust has a build script feature. This script runs just before the main application compilation. The script iterates over all files in the shaders directory and recompiles if there was a change. Now, when we build the application, the shaders get compiled into binaries. We load them in vulkan_utils::create_shader_module utility function. The specification requires the size of a blob to be a multiple of 4, and we use the ash utility function to convert bytes to Vec<u32> type. Finally in VulkanData::new() we create four shader modules.
Notice how we use vulkan_utils::set_debug_utils_object_name function here to give a shader a name.
Cleaning
Though it’s not strictly necessary to clean up on application exit, I believe it’s a good habit to do so. In vulkan_base::VulkanBase::clean and teapot::VulkanData::clean, we destroy all the Vulkan objects we created during the lesson. It’s important to destroy base objects (from vulkan_base::VulkanBase) after the application objects since the former use Device. For example, device.destroy_shader_module. In general, for every create function, the Vulkan has a corresponding destroy function, for every allocate - free. As with the case of manual new and delete management in C++, it’s difficult to keep track of created and destroyed objects. For some reasons that will be clear later, it’s not always possible to drop the object as soon as it’s not needed (spoiler - though the object is not needed on the host, it still can be used on the device). That’s why destroying a Vulkan object in drop can’t be implemented without special tracking, and we’ll not do this in the tutorials. Fortunately, Vulkan has a mechanism for tracking live objects with the help of validation layers. These are special software that is injected between the Vulkan function call and a driver, and which can do some checks. Besides live object tracking, the layers can do tons of other stuff, like checking the API usage correctness, synchronization checking, performance recommendations, GPU printf, etc. Some layers can inject their rendering on top of our (I believe Steam does that). The layers are very important during the development, I’d say it’s a must-have for every application but should be turned off for the release build because some layers are very heavy (but still, there’s a way to activate them even for a shipped product. Yes, you can start your favorite Steam game with Vulkan support and see all the calls with the information layer turned on!).
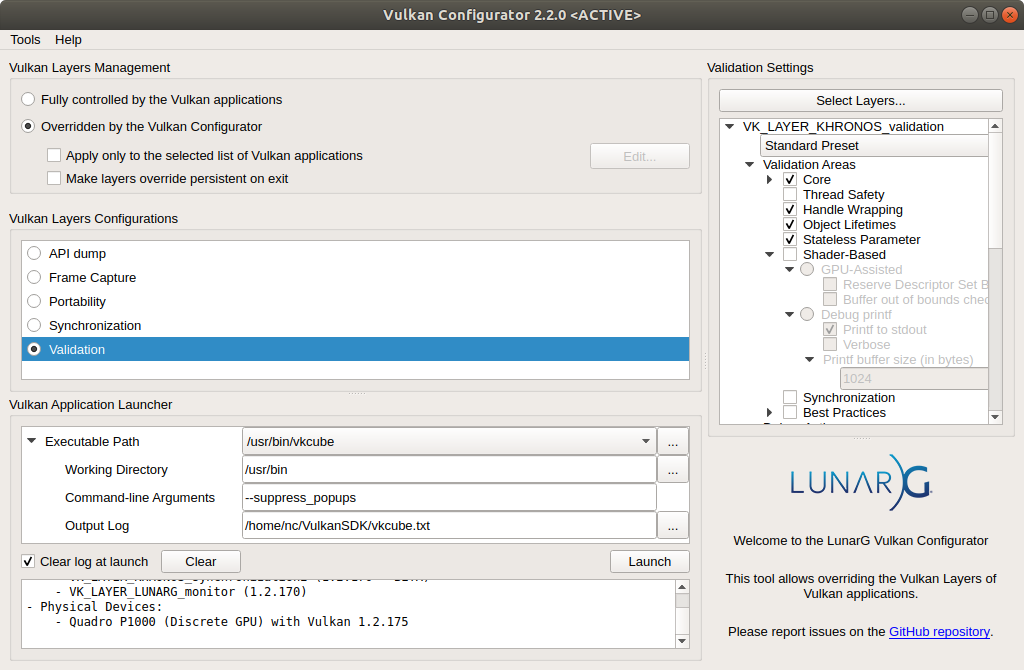
There’re multiple ways to activate layers. Previously we had to enable them programmatically in the code, but with a release of a special tool called Vulkan Configurator (vkconfig), Khronos introduced a very easy way to manage layers. All we need to do is just launch the tool, select Validation configuration (be sure that Object Lifetimes is checked), and that’s it. Either launch the application from the tool or allow the tool to override layers settings. Here’s the screenshot with the settings applied:

After launching the application, the layers will be loaded and start to produce useful information for us. For example, if we forget to destroy one of the shaders before we destroyed the device, we’ll see the message in standard output (by default, layers print to the standard output, but it’s possible to catch a message):
VUID-vkDestroyDevice-device-00378(ERROR / SPEC): msgNum: 1901072314 - Validation Error: [ VUID-vkDestroyDevice-device-00378 ] Object 0: handle = 0x557deaa0ba90, type = VK_OBJECT_TYPE_DEVICE; Object 1: handle = 0x50000000005, name = fragment shader, type = VK_OBJECT_TYPE_SHADER_MODULE; | MessageID = 0x71500fba | OBJ ERROR : For VkDevice 0x557deaa0ba90[], VkShaderModule 0x50000000005[fragment shader] has not been destroyed. The Vulkan spec states: All child objects created on device must have been destroyed prior to destroying device (https://vulkan.lunarg.com/doc/view/1.2.162.1~rc2/linux/1.2-extensions/vkspec.html#VUID-vkDestroyDevice-device-00378)
    Objects: 2
        [0] 0x557deaa0ba90, type: 3, name: NULL
        [1] 0x50000000005, type: 15, name: fragment shader
Notice how the layer prints the shaders name that we set with debug utils extension!
Without the debug name, the same message will be:
VUID-vkDestroyDevice-device-00378(ERROR / SPEC): msgNum: 1901072314 - Validation Error: [ VUID-vkDestroyDevice-device-00378 ] Object 0: handle = 0x55d5805b8a90, type = VK_OBJECT_TYPE_DEVICE; Object 1: handle = 0x50000000005, type = VK_OBJECT_TYPE_SHADER_MODULE; | MessageID = 0x71500fba | OBJ ERROR : For VkDevice 0x55d5805b8a90[], VkShaderModule 0x50000000005[] has not been destroyed. The Vulkan spec states: All child objects created on device must have been destroyed prior to destroying device (https://vulkan.lunarg.com/doc/view/1.2.162.1~rc2/linux/1.2-extensions/vkspec.html#VUID-vkDestroyDevice-device-00378)
    Objects: 2
        [0] 0x55d5805b8a90, type: 3, name: NULL
        [1] 0x50000000005, type: 15, name: NULL
Feel the difference.
The call to the clean function happens in main function on exit request or if initialization has failed. Notice how we take ownership of the structs in the teapot::vulkan_clean function by moving the data from the Option. This function should be the last call in the app and should be called only once. After it, no more Vulkan data is available.
What next
We have a pack of compiled shaders. We have Vulkan objects that represent these shaders. But if we launch the program, we’ll see the same empty window. Everything we’ve done so far was a CPU (host) part, and now we need to upload the shaders to the GPU together with other resources the shaders refer to. We’ll do this next time.
The source code for this step is here.
You can subscribe to my Twitter account to be notified when the new post is out or for comments and suggestions. If you found a bug, please raise an issue. If you have a question, you can start a discussion here.