Hi everybody. Today I’d like to talk about Vulkan - the modern API for communication with a GPU device. Though there’re already tons of information and tutorials on the web I’m writing this tutorial for several reasons:
- I don’t want this series to be about general usage of the API. Instead, I want to focus on a single purpose application, more or less complex, not just a triangle, and explain how everything works by looking at a concrete example.
- Instead of
C/C++, I want to tryRustprogramming language because at the moment of writing there’s simply no information about the subject. - The popular tutorials are a bit outdated. No, they are great and work fine, but
Vulkanevolves, and new features and paradigms appear with time. - I want to understand
Vulkanbetter. And, as you know, trying to explain something helps to understand it better.
I’d recommend starting this series after you finish vulkan tutorial and/or API without Secrets. These resources explain in great detail the API usage and after reading them you should have a solid understanding of what Vulkan is. So if you didn’t read them, take a pause and follow the links. See you next year!
For those who already have an understanding of what Vulkan is, I’ll try to continue to build a mental picture around the API, explain why do we need every bit of code, every structure we use. I’ll build every next lesson on top of the previous by adding new stuff, but without modifying the old - I found that it’s easier to follow. Though this rule is not strict and sometimes I’ll have to return and change the existing code, but I’ll try to minimize it.
This is not the first attempt to write the tutorials. At first, I wanted to describe every single detail of the API, every field of every struct I used. You can imagine the amount of information I had to cover. Since I wanted to finish before I’m 90 and since the Holy Specification explains it better I decided to drop the idea.
In my second attempt, I tried to duplicate the code in the article so a reader doesn’t need to jump from one link to another, but I had to drop that idea too - since even a simple triangle takes more than 1000 LOC you can imagine the amount of text I had to put in every article. Instead, I’ll use links to the code on Github - this saves a lot of space and does not require updating an article in case the code changes. If you find this uncomfortable buy a second monitor you can split a browser window and follow text and code at the same time. Also, I’ll not post links to the specification because a - spec changes and b - it’s very easy to search. Simply navigate to a spec version you’re interested in, for example here’s the link for the Vulkan 1.2 specification with extensions, type the term you’re searching for and enjoy.
Also, I used C++ before (this is still my main language at work) but I fell in love with Rust. Seriously, no more ugly CMake, no more problems finding and compiling a third-party library. Just imagine - the same code, written on Ubuntu works on Windows without any modification! And as a 10+ years C++ developer I am amazed how it’s easy to get third-party dependencies - you just add a name and a version to a special file and it “just works". Anyway, I still have the repo in C++, so if you like the pain you’re welcome! The repository has multiple branches - each next branch is built on top of the previous. I organized the code in a functional style and dedicated an entire article to explain how this works and why the code looks so strange.
Disclaimer: I’m not an expert guru ninja, I’m learning. And definitely, there will be mistakes in my lessons. I’m kindly asking you to point to them so I can fix them soon. You can find me on Twitter, or even better - create an issue on github.
The goal
This is our goal:
Wow, The Rotating Teapot! Sorry for the blurriness - youtube mercilessly messed up with quality and I don’t know how to fix it. As you can see, the application uses tesselation to change the geometry detail. It can be rendered in solid or wireframe mode. I chose it because it covers a lot of pipeline stages so I have to touch a great number of different parts of the API, which is good. I did it before with DirectX 12, so I already have some ideas on how to start.
What will not be in the tutorials
In addition to general graphics concepts, I assume you know what tesselation is, why there are two related stages in the pipeline (tesselation control and tesselation evaluation), so I’ll not explain that in detail. The same goes for curved surfaces - if you need to refresh your memory I recommend this Gamasutra article. I’ll not explain the math behind projection and other transformation matrices as well. Also, this is not a Rust tutorial and I assume you already installed the Rust compiler and Vulkan SDK.
Code organization
I organized the code in so-called workspaces.
lesson/
 ├──shaders/
 │   ├──sompiled_spirv
 │   └──...
 ├──teapot/
 │   ├──shaders/
 │   │   ├──sources
 │   │   └──...
 │   ├──src/
 │   │   ├──vulkan/
 │   │   │   └──...
 │   │   ├──main.rs
 │   │   └──teapot_data.rs
 │   ├──build.rs
 │   └──Cargo.toml
 ├──vulkan_base/
 │   ├──src/
 │   │  └──...
 │   └──Cargo.toml
 ├──vulkan_utils/
 │   ├──src/
 │   │  └──...
 │   └──Cargo.toml
 └──Cargo.toml
vulkan_base responsible for initialization, teapot is specific for this concrete example, vulkan_utils encapsulates common functionality. The build script lesson/teapot/build.rs will build shader sources from lesson/teapot/shaders and place the compiled binaries in lesson/shaders. I chose glsl as a shading language, though Vulkan does not require it. The geometry data is stored in the teapot_data.rs file. Cargo.toml files hold dependencies that are used in the corresponding workspace. Also, I tried to have a module per function - though it brings a lot of source files it makes code navigation easier, at least for me - I hate 1000s lines long files.
The data
One of the first links in Google offers us a nice teapot dataset. Though it looks good, it requires some processing - if we use it as it is, we’ll get an uncomplete model:


The initial data describes only a part of the teapot - the body represents a quarter of the object, and the handle and the spout represent half. One way to solve the incompleteness would be to draw multiple instances of the same part. But I find it more complicated than just duplicating the data - it would require multiple draw calls and some other things. I chose to copy indices instead. For example, one rim patch is presented by 16 indices (the dataset uses 16-point patches) - 102, 10, 104, 105, 4, 5, 6, 7, 8, 9, 10, 11, 12, 13, 14, 15 - this represents the quarter of the teapot rim. So we need 4 such patches to build the complete hull. I added the same indices 3 more times to the patches vector. But as you can guess, just copying the indices will not work - I’ll end up rendering the same patch in the same place. That’s why I have to introduce another vector with patch transformations. Now the original rim patch will be rendered with identity transform, the next one - with 90 degrees rotation, the third one - with 180 degrees rotation, and the last one with 270 degrees rotation to enclose the surface completely. For mirrored parts, it’s a little bit trickier - if I just make a copy of indices and use a mirror matrix (which is a scale matrix with -1 along the mirror axis) - the winding order will change. In the following picture I tried to visualize the problem:

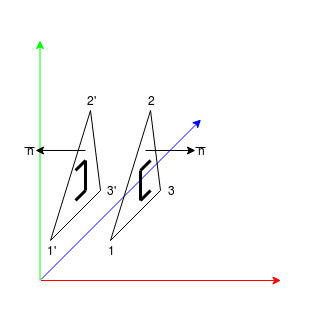
Here the right triangle’s face points in the positive x direction. Clockwise indices are 1-2-3. Now if I want the mirrored triangle to face the negative x direction, I can’t use 1-2-3 anymore - I need to change the order to 1-3-2 (or change the winding order to counter-clockwise, which I don’t want to do since that would require a pipeline change and a separate draw call). That’s why I decided to tweak indices if I use a mirror matrix.
All the data is stored in the teapot_data.rs file - a list of control points, 28 patches 16 points each, and a per-patch data. For visualization, I added random colors. Later in a shader, I’ll use patch id (kindly provided by the runtime) to sample the data to get transforms and colors and apply them to a corresponding patch.
Conclusion
The main.rs file begins with the initial setup. Here we create a logger (log and simplelog crates) which will be used to print useful information. Also, winit (winit crate) window is instantiated and an infinite loop is started. The variable app_exit is needed to control, well, the exit. By the nature of winit crate, the entire application will be closed as soon as the window is closed. In CloseRequested handler a cleanup will be executed and all resources will be destroyed. It can happen though that next the MainEventsCleared handler will be executed and we don’t want to do any job after all objects are gone. So we simply return from the loop in that case.
If you compile the code and run the application at this point, you’ll see a boring empty window.
What next
The entire article and no single line of Vulkan code! Sorry for that, it was a necessary long introduction, but I promise that in the next lesson we’ll start the real work.
The source code for this step is here.
You can subscribe to my Twitter account to be notified when the new post is out or for comments and suggestions. If you found a bug, please raise an issue. If you have a question, you can start a discussion here.